


Prevent corrosion of Yanmar 3JH, 4JH engines and Volvo D1, D2, D3, MD22, TMD22... heat exchangers
I have a sealing kit available to solve/reduce the problem. Email me and send me the order form. See also the end of this repair report.
A video will be available on my YouTube channel soon.

Yanmar and Volvo, two renowned marine engine manufacturers, combine cast aluminum heat exchangers with exhaust mixers made of stainless steel or cast iron, thus creating galvanic corrosion from the first day of operation.
For Volvo pictures, please see further down.
Temperature alarm on a Yanmar 3JH3 engine. Cooling water is coming out of the exhaust, but further inspection reveals no cooling water in the internal cooling circuit. Any additional cooling water quickly seeps away somewhere. Everything on the engine is dry and it runs smoothly, so the search for the cause is focused on the heat exchanger. This is where the excess engine heat is transferred to the external seawater cooling circuit.

In the heat exchanger, the heat from the internal engine cooling circuit is cooled with seawater, as are the engine exhaust gases. In the exhaust mixer, the exhaust gases are mixed with the seawater from the heat exchanger and fed into the flexible exhaust hose with a water lock. When the water lock is full, the water-exhaust mixture is expelled overboard.
In the Yanmar engine, the exhaust mixer and heat exchanger are connected and sealed with a V4A metal gasket according to the manufacturer's instructions.
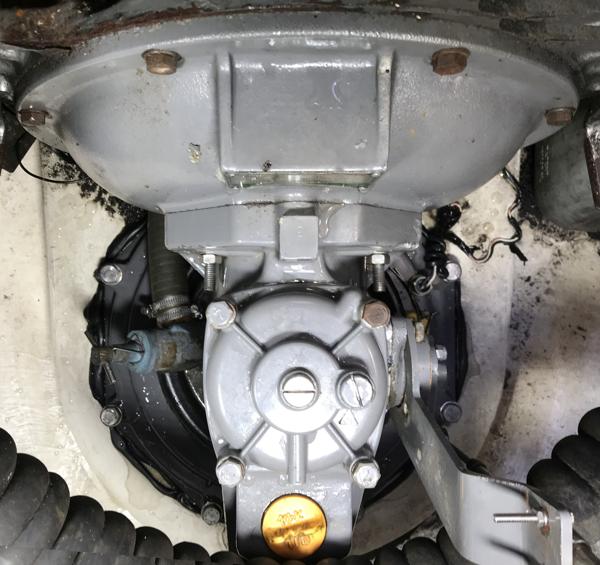
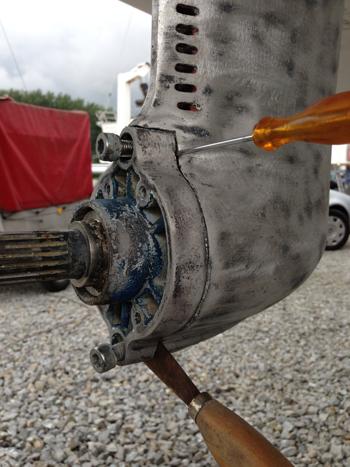
Overview of a nearly 25-year-old Yanmar 3JH3CE diesel engine with an SD50 saildrive.

Removing the heat exchanger with exhaust mixer is relatively easy. Five screws, two nuts, and a few hose clamps later, the heat exchanger and exhaust mixer are removed.


Left image: After removing the exhaust mixer, the cause was quickly identified. Extensive corrosion around the exhaust outlet had done its work, creating a connection between the exhaust duct and the internal cooling circuit. The water from the internal cooling circuit had drained into the exhaust system, causing overheating.
Right image: In contrast, a new heat exchanger.
Clearly visible is the corrosion that had eaten its way from the exhaust system into the aluminum material of the heat exchanger. And not, as a Yanmar service center tried to convince me, that they had neglected to replace the coolant in the internal engine cooling circuit.
The damage pattern certainly looks familiar. An aluminum heat exchanger is connected to a V4a gasket and a V4a exhaust mixer. It all looks like a galvanic cell.

The galvanic potentials between the aluminum alloy of the heat exchanger and the V4A gasket/exhaust mixer are far apart. The voltage difference is over 1V. To create a galvanic element, the two metals must be connected.
Using a multimeter, the resistance between the aluminum heat exchanger and the V4a exhaust mixer is measured at 0.0 ohms. The different metals are therefore very well bonded.
A few basics:
Galvanic element made of aluminum heat exchanger and V4a gasket/exhaust mixer.

An electrical circuit, even a galvanic one, must be closed for current to flow (red arrow) and the destructive work to take place. When current flows, the aluminum electrons migrate to the V4a stainless steel and replace the lost electrons. The aluminum atoms, deprived of their two electrons (= aluminum ions), then detach from the stable metal lattice. The heat exchanger essentially functions as a sacrificial anode to protect the V4a stainless steel.
What performs the function of the electrolyte in this galvanic cell?


For this purpose, the exhaust mixer was also removed from the heat exchanger on a similar machine. This machine had received a new heat exchanger at approximately 2000 hours of operation, which is now 10 years old and has 1000 operating hours on the clock.
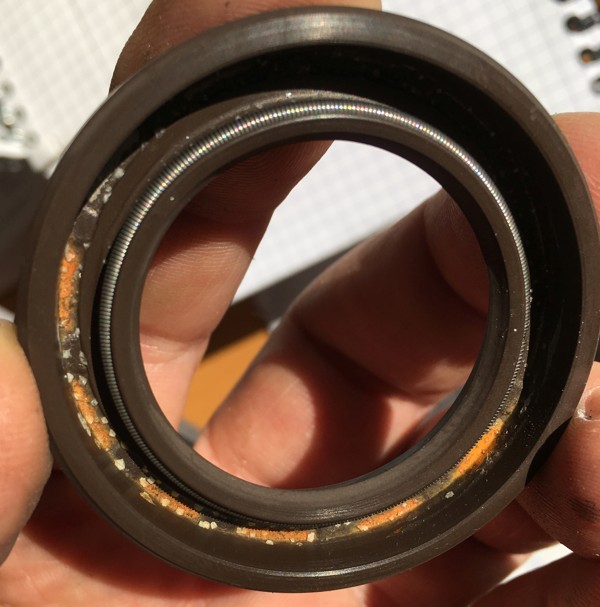
Left image: Water droplets in the exhaust mixer on a layer of soot. A layer of soot is also conductive.
Right image: Moist crystalline deposits in the heat exchanger, directly behind the V4a seal. Here, too, corrosion damage is already visible at the heat exchanger outlet. The numerous moist deposits directly behind the V4a seal in the heat exchanger are noticeable. There are more of them at the bottom than at the top, which indicates the accumulation of condensate. This is despite the fact that the prime mover always ran for at least 20-30 minutes, or had otherwise been operated for several hours.
Exhaust temperatures in small diesel engines range from approximately 300°C to 600°C. Approximately 20 cm behind the heat exchanger outlet, seawater mixes with the exhaust gases. When the engine is stopped and cools to ambient temperature, the hot exhaust gases in the exhaust pipe contract by a factor of 2.2.
In addition, when the engine is shut down, the compression can stop the rotational movement before the last pass through top dead center and cause it to reverse. It is very likely that a cylinder was in the exhaust stroke in this situation and drew in up to 1/3 of its displacement = 0.5 liters of exhaust gas from the heat exchanger. (3JH3 engine, 1500cc displacement)
For the two reasons mentioned above, it is conceivable that air moistened by salt water could reach the heat exchanger, condense there, and collect between the V4A gasket and the aluminum heat exchanger. The galvanic element heat exchanger/exhaust gas mixer has thus received the necessary electrolyte.
Since there is no sacrificial anode in this area, galvanic corrosion takes its course.
Stopping galvanic corrosion:
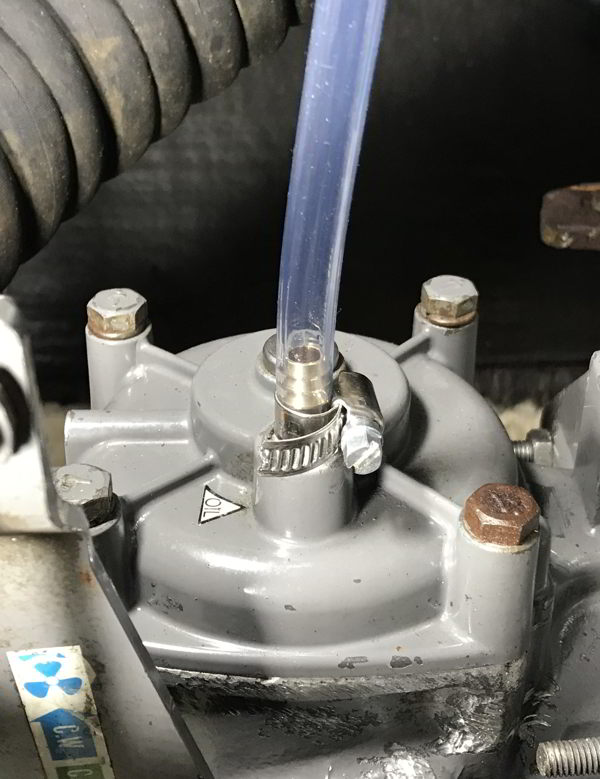
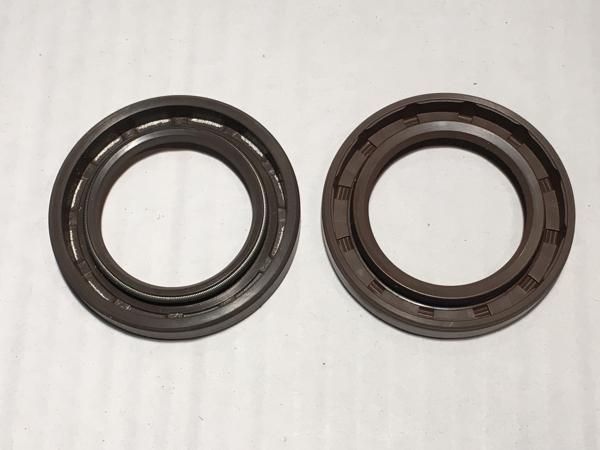
To stop galvanic corrosion, the galvanic circuit must be interrupted. The condensate (electrolyte) cannot be prevented, so the exhaust mixer must be mounted insulated from the heat exchanger. This means the original Yanmar V4a gasket remains.

I then started testing with electrically insulating seals for exhaust systems.

A new seal is cut from a sample.
With a pillar drill it is easiest to drill the hole to 10mm at slow speed and with drilling oil.
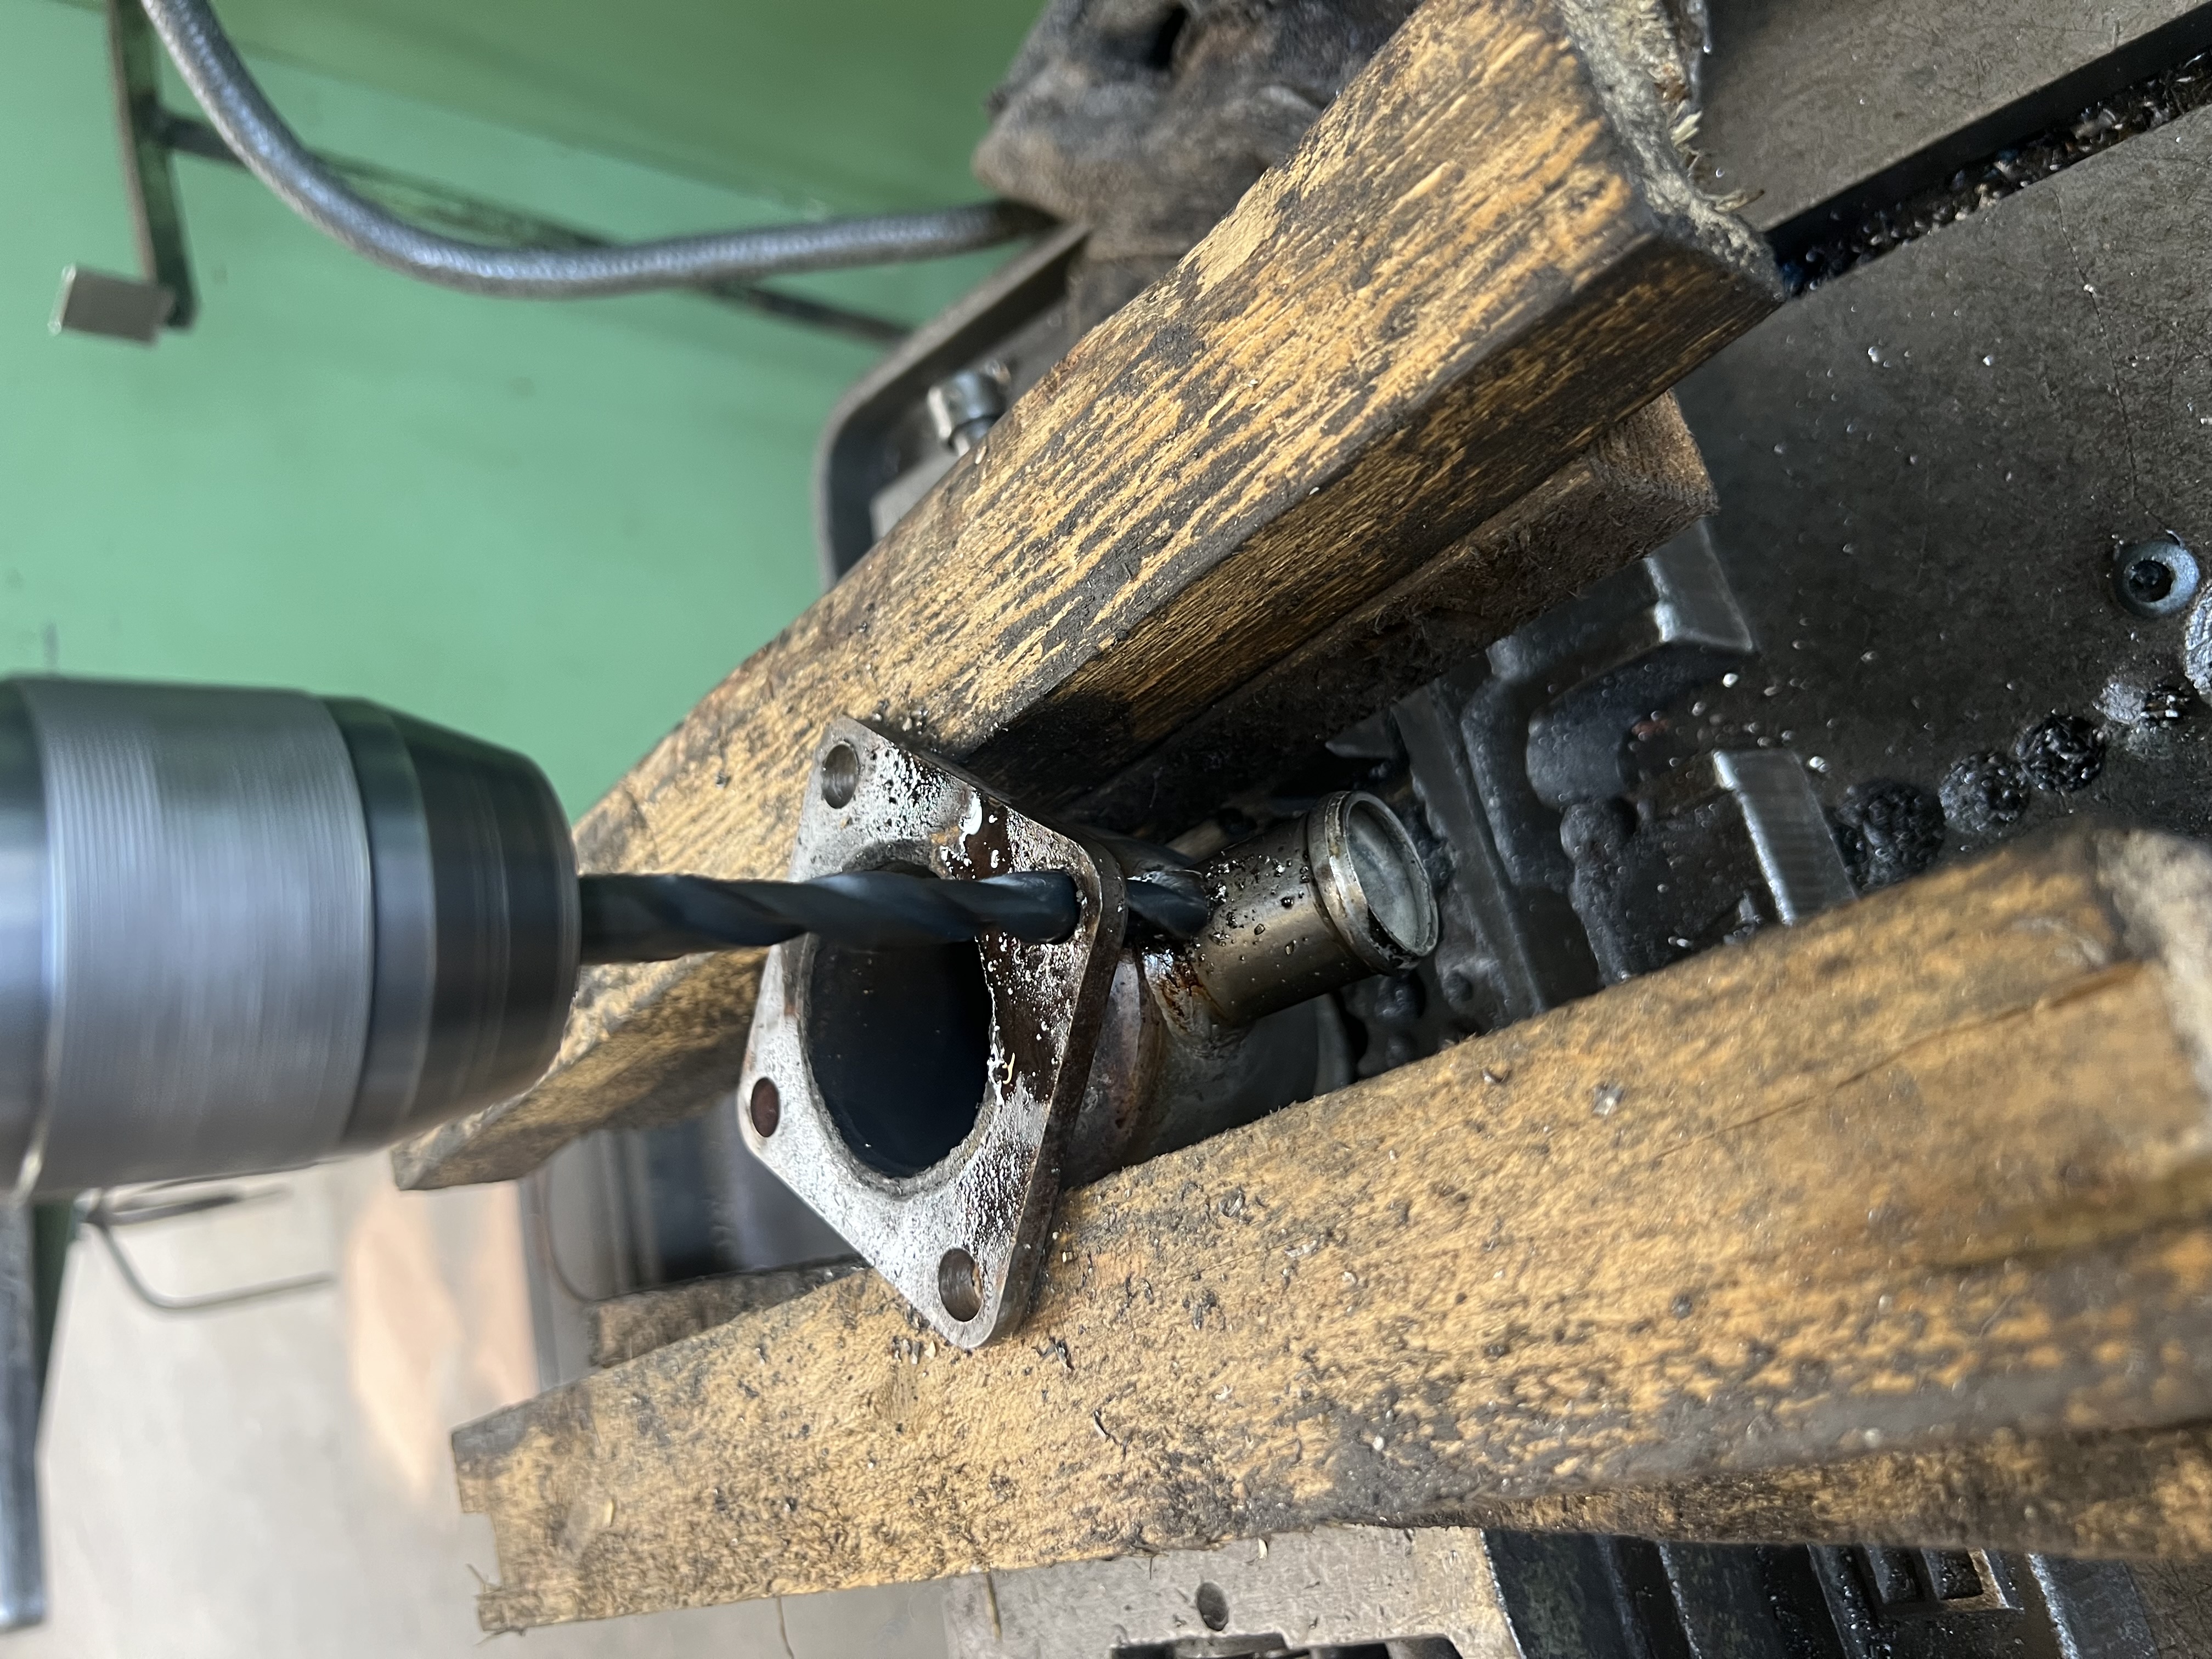
This can also be done with a hand drill.
Note: Regardless of the drilling machine, use new, sharp drill bits (there are also special drill bits for V2A/V4A steel), drill slowly, and cool the drill bit with oil. Otherwise, the hole will be elongated.
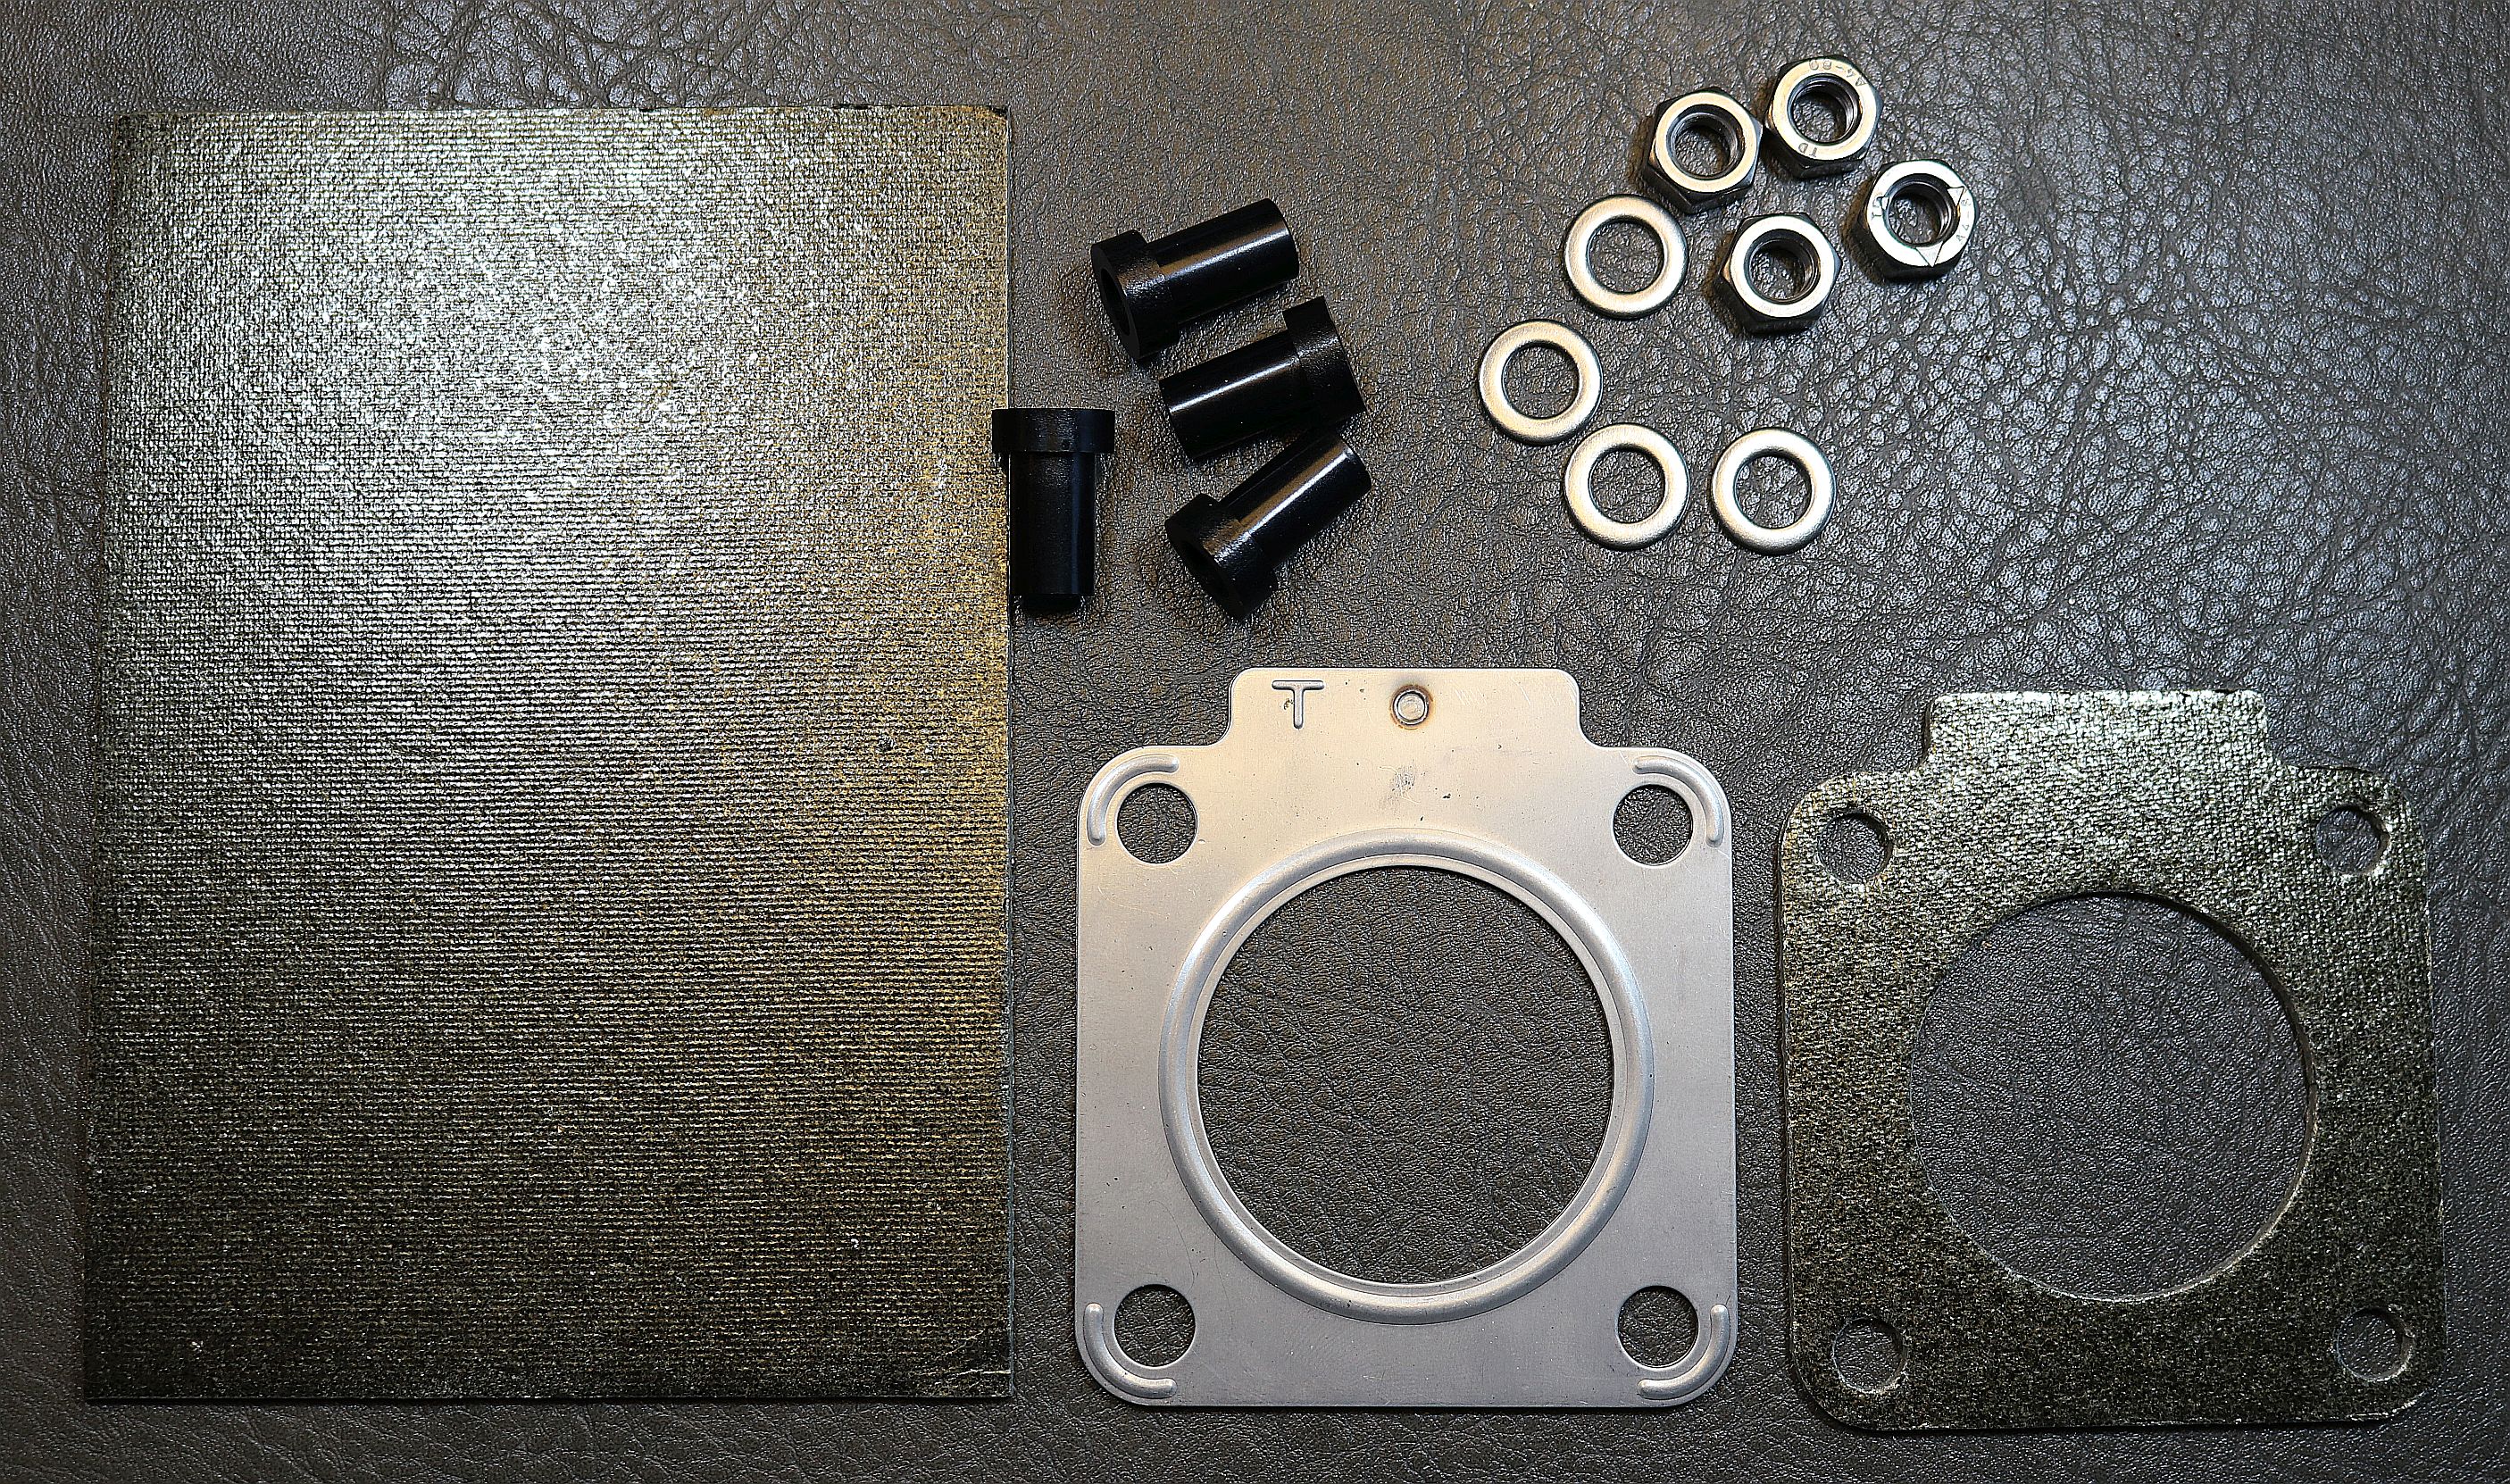
The fiberglass-reinforced polyamide sleeves with a collar are shortened so that they no longer protrude and are flush with the mounting surface. This can be done with a small angle grinder.

The exhaust mixer is bolted on with washers and lock nuts.

After installation, the ohmic resistance between the exhaust mixer and the heat exchanger is measured. Here, it is infinite (O.L). This means there is no longer any electrical connection. The galvanic circuit is interrupted.

The exhaust mixer is now mounted insulated from the heat exchanger. After a test run lasting several hours, nothing came loose or leaked. A review will be conducted this fall to determine how the seal performs in this environment.
Inspecting the seal and cleaning the transition between the heat exchanger and exhaust mixer must then be included in the engine's annual maintenance schedule.

A temperature measurement at the connecting flange showed a temperature of 95°C – 105°C. This is still well below the maximum temperature of the sealing material and insulating sleeves.

The repair described is also ideal for maintaining or extending the functionality of a still-functioning heat exchanger/exhaust mixer. It stops or reduces galvanic corrosion and extends the service life of the heat exchanger until repair/replacement is necessary.
Notes on preserving the value of the exhaust mixer

The exhaust hose on the exhaust mixer is screwed to the heat exchanger in an insulated manner.
The exhaust hose between the exhaust mixer and the water collector is designed to prevent the transmission of engine vibrations to the water collector during operation. The exhaust hose is heavy and strains the exhaust mixer. A few years ago, I noticed a small crack in the exhaust mixer.


Image left: Crack from the outside. Image right: View from the inside.
Even after cleaning with a blasting device, the contamination inside the exhaust mixer is so severe that a stainless steel weld will not hold, according to a welding expert.
Contaminants will continually escape from the crack during welding, complicating the weld's adhesion.


Image left: Without reinforcement. Image right: With a stainless steel reinforcement.
But a stainless steel reinforcement can be installed on the outside, which will drastically extend the service life of the exhaust mixer. He was right. After 10 years, this part is still in operation.
So I can highly recommend this service life-extending measure.
Yanmar's conclusion:
Yanmar has an impeccable reputation for propulsion engines in the marine and construction sectors. So why would a renowned manufacturer enter the market with such a (deliberate?) design flaw? Do they want to give their service companies an additional slice of the service life pie in addition to normal maintenance?
Why was the material chosen in such a way that the much more expensive part would be destroyed by galvanic corrosion? A cheaper "loss part" that protects the heat exchanger would certainly be more in the interest of the customer.
The heat exchangers last 10-12 years, sometimes a bit longer. In addition, such spare parts not only become exorbitantly expensive over the years (2025: approx. €3,600), but eventually become unavailable. This is despite the fact that the engine continues to start reliably and would gladly deliver many more hours of operation.
I asked Yanmar these and other questions in July at a personal meeting in Almere, Netherlands.
Yanmar provides spare parts for 10 years after the end of production, plus an additional five years for safety reasons. Where possible, the heat exchangers are used together for an engine group. Furthermore, heat exchangers are found not only in the marine sector but also in the construction and industrial sectors. Therefore, Yanmar expects a much longer availability than the stated 15 years.
My recommendation is to insulate the heat exchanger from the exhaust mixer, as described. This is the only way to prevent galvanic corrosion on the heat exchanger, or at least significantly slow it down. Then include the connection between the heat exchanger and the exhaust gas mixer in a 1-2 year inspection plan, and then nothing stands in the way of a long service life of the heat exchanger.
For this purpose, I created a repair kit with the support of a gasket manufacturer.
It contains all the parts needed to isolate the exhaust mixer from the heat exchanger. The original stainless steel seal shown is replaced by the seal from the kit. Email me and send me the order form.
The kit is compatible with the following engines:
3JH2, 3JH2E, 3JH2BE
3JH3, 3JH3E, 3JH3CE, 3JH3Z, 3JH3Z1, 3JH3Z2
3JH4BE, 3JH4C, 3JH4E
3JH5E
4JH, 4JH-HT
4JH-T, 4JH-TE, 4JHE
4JH2-DTE, 4JH2-HTE, 4JH2-TE
4JH2-UTE, 4JH2-UTB, 4JH2E
4JH3, 4JH3-DTE
4JH3-TCE, 4JH3-TE, 4JH3ZA
4JH4-HTBE, 4JH4-HTE, 4JH4-TBE
4JH4-TCE, 4JH4-TE
4JH4AE, 4JH4C, 4JH4E, 4JH4GB4E
Gasket kits for other engine types are in preparation. The kit is also available with a postcard-sized piece of gasket material. This can be used to cut a gasket for an engine not listed here.
Preventing Heat Exchanger Corrosion in Volvo D1, D2, D3, MD22, TMD22 and 20XX Engines
This problem is also not unknown with Volvo machines.
In the spring, my dock neighbor on his D1-30F machine also had a rusted-through heat exchanger with a cast iron exhaust mixer connected to it.
This machine is 12 years old. The repair was carried out using genuine Volvo parts worth approximately €3,000.
The photo on the left shows the machine after the repair. The heat exchanger (silver), the gasket, and the exhaust mixer (green in the foreground with the connected exhaust hose) were replaced according to the manufacturer's instructions.
The familiar signs of corrosion were visible at the outlet of the old heat exchanger.


Using a grinding test (see the end of this repair report), it was quickly determined that the heat exchanger is made of cast aluminum and the exhaust mixer is made of gray cast iron. If these two parts are joined according to the manufacturer's instructions, a galvanic cell is created, with the known corrosion damage. See also the table on galvanic potentials at the beginning of this repair report.
The exhaust mixer on this machine will also soon be electrically insulated, thus preventing or reducing the formation of the galvanic cell. The procedure is the same as described above for the Yanmar machine: a temperature-stable gasket, glass-fiber-reinforced sleeves, V4a washers, and lock nuts.
Conclusion Volvo:
The cast-iron exhaust mixer is also offered as a V4a part. The galvanic voltage is even greater in this case, and corrosion progresses even faster. See the table at the beginning of this report. That can't be the solution. Corrosion of heat exchangers at the transition to the exhaust mixer is also being reported in various Volvo forums. The 10-12 year period also comes up repeatedly.
I've tried to contact Volvo about this issue, so far without success.
With the help of a gasket manufacturer, I've created a repair kit.
It contains all the parts needed to isolate the exhaust mixer from the heat exchanger. Just send me an email and enclose the order form.
The kit is compatible with the following engines.
D1-13, D1-13B, D1-13F
D1-20, D1-20B, D1-20F
D1-30, D1-30B, D1-30F
D2-40, D2-40B, D2-40F
2010, 2010-C, 2010-D
2020, 2020-C, 2020-D
2020B
2030, 2030-C, 2030-D
2030B
2040, 2040-C, 2040-D
2040B
Additional kit for Volvo engine types:
D2-55A, D2-55B, D2-55C, D2-55D, D2-55E, MD22L-B, MD22P-B, TAMD22P-B, TAMD31S-A, TMD22-B, TMD22P-C
Gasket kits for other engine types are in preparation. The kit is also available with a postcard-sized piece of gasket material. This can be used to cut a gasket for an engine not listed here.
Material analysis using grinding sample:
As a shipowner, you're not usually also well-versed in metallurgy. A good tool for a rough assessment of the material is a grinding test using a grinder.

Cast aluminum, rather fine dust without sparks

Stainless steel, single red sparks in a straight line

Cast iron, reddish sparks in a compact jet.
Disclaimer:
This manual was compiled and written to the best of my knowledge and belief based on a repair/maintenance job I performed myself.
I have carefully prepared and checked the manual. No liability is assumed for the use of this manual or for damage caused by this manual or parts.
Copyright:
Jochen Brickwede, August 2025